DIY Solar Power: Build a 200W System with Lithium Battery for Under $500
Demystifying Solar: A Step-by-Step Guide to Building a Budget-Friendly 200W Power System
The allure of off-grid power is undeniable. Whether for a camper van, an RV, a remote cabin, or simply as a reliable backup during power outages, having a self-sufficient energy source provides freedom and peace of mind. However, the world of solar power can often seem complex and expensive, filled with technical jargon and high-priced components. This guide, based on a detailed walkthrough, demystifies the process by showing how to assemble a complete and robust 200-watt solar system, complete with a 100-amp-hour lithium battery, for under $500. It’s a practical, hands-on approach that proves quality off-grid power is accessible to everyone, not just those with deep pockets or an engineering degree.
Why a DIY Kit Trumps an All-in-One Power Station
The first crucial decision in any solar project is choosing between an all-in-one portable power station and a component-based DIY kit. While power stations offer convenience, they are often significantly more expensive for the capacity they provide and offer less flexibility. For a 200-watt setup, a DIY kit is the superior choice. It allows you to select individual components, optimize the system for your specific needs, and, most importantly, achieve a much lower price point. The featured build utilizes a Boug RV solar kit, a brand the creator has trusted for over three years. This kit provides an excellent foundation, including the most critical and costly components in one package, simplifying the purchasing process and ensuring compatibility.
Deconstructing the Under-$500 Solar Build
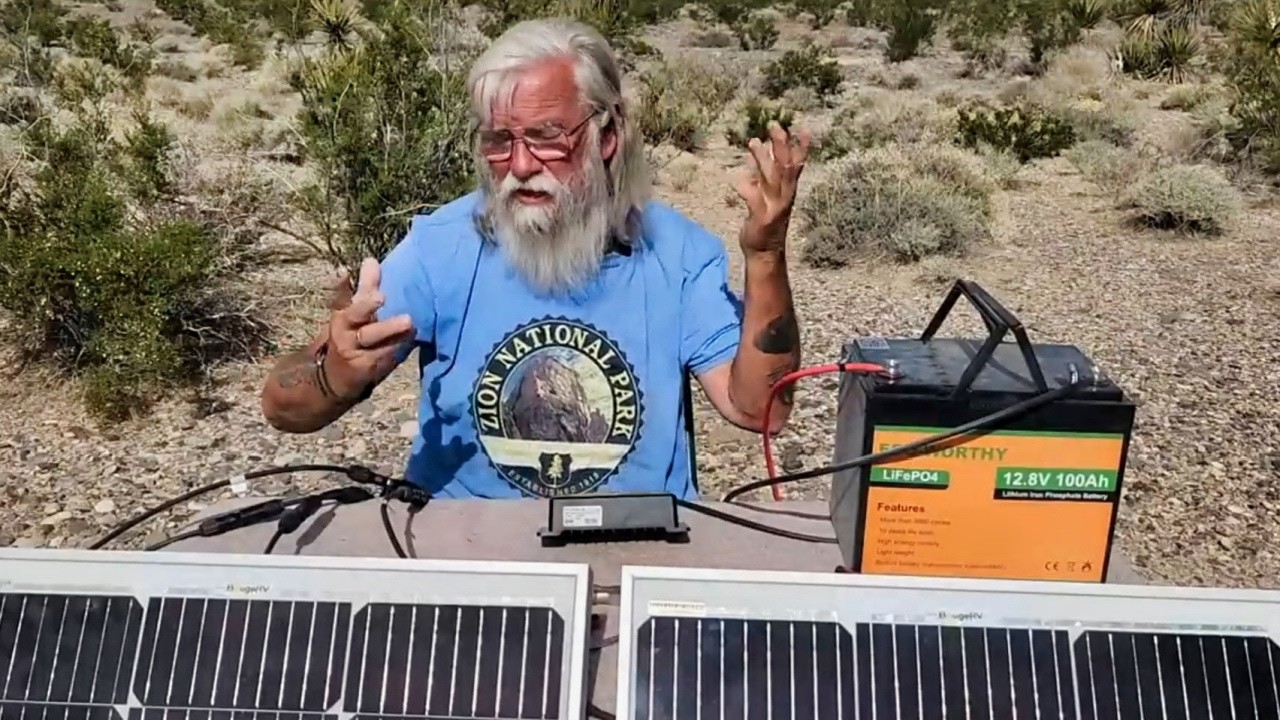
The core of this affordable system consists of two main purchases: the solar kit and the battery. By carefully selecting these items, the total cost can be kept impressively low, with the build showcased coming in at approximately $470 before taxes.
The Boug RV 200W Solar Kit (Approx. $230): This comprehensive kit forms the backbone of the system. It includes:
- Two 100-Watt Monocrystalline Solar Panels: These are the energy collectors. The kit provides two high-quality panels that, when combined, deliver 200 watts of power. They come with industry-standard MC4 connectors, ensuring compatibility with other solar components.
- 30-Amp PWM Charge Controller: The charge controller is the brain of the system. It regulates the flow of electricity from the solar panels to the battery, preventing overcharging and ensuring safety. While more advanced MPPT controllers exist, the included PWM (Pulse Width Modulation) controller is perfectly adequate and cost-effective for a system of this size.
- Essential Cabling: The kit provides all the necessary wires, including long cables to connect the panels to the controller and a shorter cable to connect the controller to the battery. It also includes parallel connection cables (Y-branch connectors) to easily combine the output of the two panels.
- Mounting Hardware: A full set of Z-foot mounts, nuts, and bolts is included. This hardware is designed to securely fasten the panels to a roof while maintaining a crucial air gap for cooling, which improves panel efficiency.
The EcoFlow 100Ah LiFePO4 Battery (Approx. $240): The battery is the heart of the system, storing the energy collected by the panels. The choice of a 100-amp-hour Lithium Iron Phosphate (LiFePO4) battery is strategic. LiFePO4 technology offers a long lifespan (thousands of charge cycles), superior safety, and a lighter weight compared to traditional lead-acid batteries. The EcoFlow battery selected offers a great balance of performance and price.
A Step-by-Step Assembly Guide
Assembling the system is a straightforward process, though it requires attention to detail. The most critical rule is to always connect the battery to the charge controller *before* connecting the solar panels. This allows the controller to recognize the system's voltage (12V in this case) and prevents a surge of power from the panels from damaging the unit.
Frequently Asked Questions About DIY Solar Assembly
Here are answers to some common questions that arise during the assembly process.
How are the two solar panels connected together?
The kit provides parallel combiner cables (Y-branch connectors). You connect the positive leads from both panels to the positive combiner and the negative leads to the negative combiner. This results in a single positive and single negative output that doubles the amperage while keeping the voltage the same, which is ideal for a 12V system.
What is the correct order of connections for the charge controller?
1. **Battery to Controller:** Connect the battery terminals to the corresponding battery inputs on the charge controller first. This powers the controller and allows it to auto-detect the system voltage.
2. **Solar Panels to Controller:** Connect the combined output from the solar panels to the PV (photovoltaic) inputs on the charge controller.
3. **Load to Controller:** If you are running 12V appliances directly from the controller, connect them to the load terminals last.
Are fuses necessary, and where do they go?
Yes, fuses are a critical safety component that are *not* included in the kit. You need at least two:
1. A fuse on the positive cable between the battery and the charge controller, placed as close to the battery terminal as possible. This protects against short circuits.
2. A fuse on the positive line between the solar panels and the charge controller. An in-line MC4 fuse is a great option as it also serves as a convenient disconnect switch.
Why is there an air gap under the solar panels?
The Z-foot mounts create an air gap of over an inch. This is crucial for ventilation. Solar panels lose efficiency as they get hot, so allowing air to circulate underneath them helps to keep them cool and maintain optimal performance.
The assembly primarily involves connecting these components in the correct order. The final step involves stripping the ends of the solar-to-controller cable and crimping on fork connectors for a secure connection to the controller's terminals. This meticulous process, while slightly tedious, ensures a safe and efficient system that will provide reliable power for years to come, perfect for running essentials like a 12V fridge, fans, lights, and charging devices.